Razorjaw (Hunter) is a named form that appears in current community recommendations for Anime Expeditions. “Hunter” suggests a specialized form, but it does not prove a boss bonus, target rule or any exact effect. Confirm the live card first, then test whether Razorjaw solves your team’s wave, boss or coverage problem.
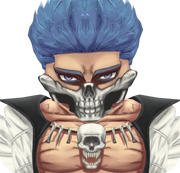
Image note: this is base-form Razorjaw art. No verified Hunter-form image is available in the local asset set.
Community corroborated: Razorjaw (Hunter) is a documented named form included in current ranking coverage.
Needs in-game verification: form route, rarity, element, archetype, effects, stats, costs, placement limit and availability. Checked July 28, 2026.
Locate the correct form and route
Open the Units menu and select Razorjaw. Read the exact display name and compare the portrait with your copy. If Hunter appears only inside Evolution, favorite the base unit and inspect the preview before collecting anything. If it appears on a live banner or another source, confirm the route from that interface rather than assuming an evolution.
The public item assets include a Jaw Skull, which may be associated with Razorjaw progression, but its current purpose, source and quantity are not confirmed here. Treat it as an item to inspect, not a guaranteed recipe.
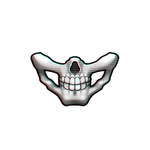
Known: the item exists in the documented asset set.
Unknown: current source, exact use, recipe quantity and whether Hunter requires it. Verify in game.
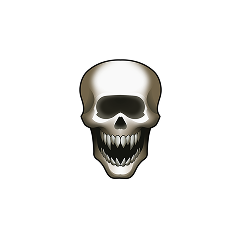
Known: documented equipment name.
Unknown: Razorjaw compatibility and best-use claim. Read the live equipment panel.
Test whether Hunter is a boss answer
Do not decide from the name. Put Razorjaw on a repeatable map, read its target type and watch how its damage is distributed. A boss unit should preserve meaningful output when one durable enemy remains. A wave unit should control several enemies without excessive overkill. Hunter may fit either or another role depending on its current panel.
Use one run to measure ordinary-wave stability and another to focus on the boss phase. Record when Razorjaw can be placed, the cost of the first useful upgrade, whether its range covers the chosen corner and how it performs when the boss enters and leaves that range.
If it handles the boss but early enemies leak, keep a low-cost opener. If it clears waves but the boss remains, add concentrated damage. If the attack pattern misses fast or spread-out enemies, adjust placement and target priority before spending rerolls.
Trait and equipment choices
Choose a trait by the observed bottleneck. Range can help a position cover more path; speed can reduce gaps between attacks; strength can improve an already reliable pattern. Rare named traits may be better in some builds, but only their live descriptions can confirm the tradeoff.
Predator’s Skull is a visually plausible item to inspect, not an asserted best-in-slot. Compare it with every compatible equipment option. Keep the same stage, position and upgrade order, then change only the item. Look for a real difference in clear timing, coverage or stability.
Use best traits by unit role and the equipment comparison guide before spending locks or rerolls.
Build the rest of the loadout
If Razorjaw is your boss slot, surround it with a cheap opener, broad lane damage and support or economy appropriate to the mode. If it is your wave carry, add a separate finisher. Avoid choosing five units from one tier band without identifying their jobs.
Deploy a cheaper unit first and save for Razorjaw. Test the earliest safe placement wave.
Move to a bend that uses the full live range and set targeting deliberately.
Compare a full boss phase, not total match damage. Add support only if the mode allows it to affect the target.
Stop upgrades at a useful breakpoint and fund the other team roles before maximizing Hunter.
In squads, decide who provides early defense. Several players saving for expensive forms can lose before the plan starts. Also confirm the selected mode’s placement and economy rules in game; they should not be imported from a different mode or update.
Controlled Hunter benchmark
Choose a stage you can clear consistently. Record difficulty, map, modifier, party size, Razorjaw form, trait and equipment. Run once with your existing boss or wave unit and once with Razorjaw in the same role. Preserve supports and upgrade order.
Compare first leak, cash required for stability, boss clear time and remaining board value. If Hunter performs better only on one enemy profile, keep it as a specialized option rather than forcing it into every loadout. That is still a valuable outcome.
Common mistakes
- Assuming Hunter has a boss bonus without reading the live effect.
- Farming Jaw Skull because the item name looks related, without a visible recipe.
- Calling Predator’s Skull best-in-slot without testing compatibility.
- Comparing a base Razorjaw with another player’s Hunter form.
- Removing the opener to fit a slow, expensive carry.
- Spending Trait Crystals before choosing the unit’s role.
- Using an undated tier position after a balance update.
Razorjaw (Hunter) FAQ
How do I get Razorjaw (Hunter)?
Confirm the route displayed in the current Summon, Units or Evolution interface. Public evidence supports the form name, but this page does not invent a banner or recipe.
Does Hunter require Jaw Skull?
The Jaw Skull exists in public item assets, but its current relationship to Hunter has not been reliably confirmed. Treat any exact requirement as Needs in-game verification.
Is Predator’s Skull the best equipment?
The item exists, but its compatibility and effect need a live check. Choose by measured stage performance rather than matching artwork.
Is Razorjaw (Hunter) better for bosses or waves?
Test the live attack pattern and effect in both situations. No permanent role is asserted without current values. Use the benchmark above to answer for your copy and target stage.